Friday, September 26, 2014

Drilling Soft Foam Potatoes

I wasn't successful trying to "drill out" an engine mount hole in the stress ball potato!
I can easily drill and hollow a hole in the round ball Styrofoam Sputnik model kits.
But the soft, heavy rubber potato won't fly! In this form, it won't end up being a kit.

I night do a "one-off" carving a potato out of white Styrofoam. Then I'll have to get some foam safe paints.
I haven't given up on this one, I think it'll be pretty funny.

Wednesday, September 24, 2014

You Say Potaytoe . . .


From an email suggestion from Gary Minton.

Okay, I found a potato.
Now make it fly!

It'll be a Spud-nik!      Hah!

Sunday, September 21, 2014

Little Green Man Decals

I'm just starting to get good flight reports from the Little Green Man kits.

If you've built the kit, you know I include some extra decals.
Some builders have problems with water slide decals. The extras are there just in case.

Here's some decal tips -
1. Always wet the model surface where the decal will be placed. That gives you a wet surface under the decal allowing you more time to slide and adjust it to the final position.
2. Soak until the decals easily slide off the backing paper. I'll usually soak the decal in water for about 20 seconds, remove it from the water and let it set on a paper towel until I need it.
3. Soak and apply each decal separately!
4. Slide just a small part off the backing, place that small exposed part on the model. Hold that end on the model and slide the backing off under the decal leaving just the decal on the model.
5. A wet Q-tip makes a great tool for rolling out air bubbles under the decal.
6. In the upper left corner of the decal sheet is the kit name and decal copy. Before using a large model decal, try transferring that word block onto the model.
You can get an idea of the soak time, how the decal slides off the backing and transfers onto the model. Just remember to remove that "test" decal.
It's good practice and you won't waste a kit decal!

The idea of including extras comes from FlisKits. Jim Flis will typically include an extra shroud.
Shrouds are sometimes hard to get right, the extra gives you a second chance for a better fit.

Friday, September 19, 2014

Odd'l Inspired Designs?


Here's two models that may have had some Pigasus influence in their designs.

Dick Stafford's Cochon d' Eau (French for Water Pig) is a water rocket.
The wide bottle fits the pig profile well. He built it for his grand kids.


Tom (Babar on TRF) posted pictures and a video of his Squirrel rocket.
It was stable on B6-4 engines but might need nose weight for C6-5s.
The TRF thread and video is HERE
Both great designs!

Tuesday, September 16, 2014

Cutting Pigasus Kit Parts

Whoever thought it would be fun to start your own rocketry company has never had to bag up kits!
I don't buy pre-cut tubes, most are 34" long to start and all are cut to size. Even the smallest length tubes are cut by hand.

I'm prepping more Pigasus kits and needed "snouts".
Here's thirty-one noses all cut to 9/16" long. I don't need this many noses right now but I've learned to cut more than you need for the next litter of kits.

Sunday, September 14, 2014

Maker Faire in Orlando


Some Odd'l Rockets were on display at the Orlando Maker Faire on Sunday.
r


I was concerned about small kids grabbing the rockets.

Roger Smith (JonRocket.com) made this great sign!

Saturday, September 13, 2014

Making Adeptors

I made up ten Adeptors last week.
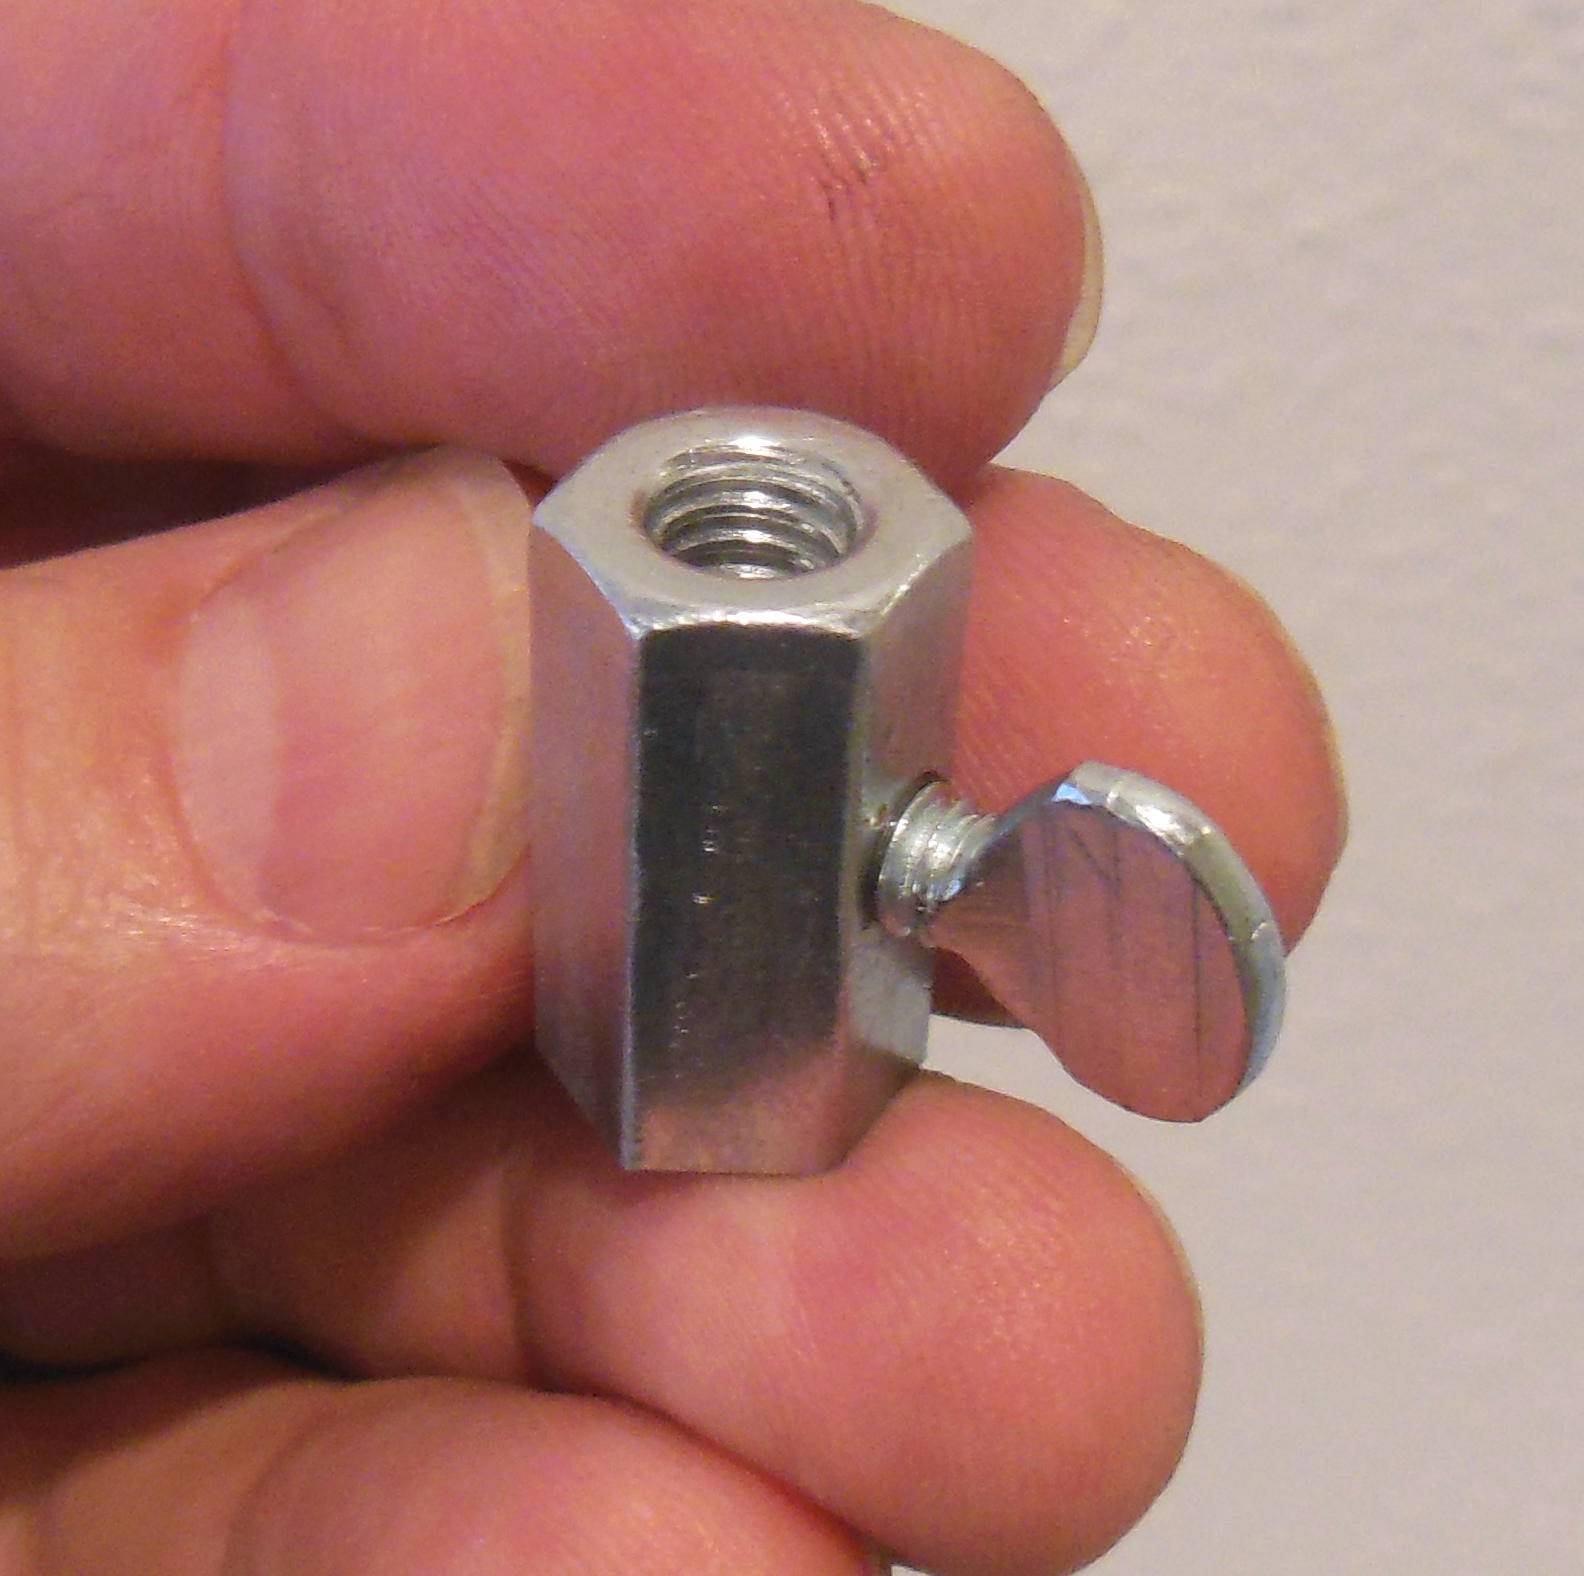
The central bolt is originally 1 7/8" long, too tall on top of a blast deflector so it's cut in half.
After cutting in two, the bottom is filed flat. The raised bolt on a camera tripod only allows a few turns. The filed flat bottom on the Adeptor gives you a additional turn to better lock it down.

A hole is drilled through the side, then threads tapped for the thumbscrew. The thumbscrew is cut shorter so it won't be in the way of the rocket fins or engine flame.

An additional fender washer is included n the bag to cover the large center hole in the newer Estes Blast deflector plates.
Then comes the printing and bagging. All in a day's work!

The Odd'l Rockets ADEPTOR is small, but it will make a big difference in how you launch rockets.
When mounted on a camera tripod there is no more wet, grass stained and sore knees. Launch pictures are easier to take and come out better.
Its much easier to connect up the micro clips when the rocket is above waist level.

NOTE: For safety, it's not necessary to raise the camera tripod legs to the full extension.
Extend the tripod legs one segment and keep the tripods center of gravity low.
Or, tie a gallon jug of water to the hook under the center base of the tripod.

Thursday, September 11, 2014

Flame Resistant Shock Cord Sales

Sales of the new Flame Resistant Shock Cords are going well enough to be added to the Odd'l Products line.
The flame resistant elastic shock cord is 1/8" x 8 yards.
There's enough in each package for eight models at one yard per rocket.

Most kit supplied shock cords are too short. Bare rubber deteriorates quickly when exposed to hot ejection charges.

NOTE: While this treated shock cord can get blackened by soot from an ejection charge, it will last much longer than other untreated bare rubber or elastic cords.
At present the Flame Resistant Shock Cord is available from JonRocket.com

Tuesday, September 9, 2014

Little Green Man Instruction Correction

Oops!
Tim at Apogee Components built a Little Green Man and found a mistake in the instructions.
Under STEP 16, there is the phrase:
Note the Right Eye is slightly larger than the Left Eye (This is incorrect!)
Looking down on the nose cone (from above), the right eye is the larger one.

It should read:
Note the Left Eye is slightly larger than the Right Eye
(The copy is now corrected in the picture above and in all new printed instructions)
The instruction illustration has always been correct.

If you have any problems with your build, I can send you a "flipped" eyes print that will fit any reversed right-left eye ovals.
I apologize for any inconvenience. It seems all kit instructions go through some revisions.

Tim also adds:
1. "I didn't need them, but the kit comes with several duplicate decals. They are there, just in case you have problems putting them on. But they do go on easily, so you probably won't need them either.
2. The kit comes with balsa wood fins, and they have lots of curved edges. Because of this, there is a chance that the wood can split along the grain. The hands and the toes are the most vulnerable to breaking. You might consider reinforcing those parts by laminating a piece of paper to the wood with some wood glue. I wish I would have done that on my rocket, as my Little Green man bumped it's toes and snapped one off. A little bit of super glue fixed that, and it is as good as new.
3. Because this rocket has pipe-cleaner antenna on top, there is a chance that they could alter the flight path of the rocket. Be prepared for this and have spectators stand a little further back when launching the rocket."

In response:
1. Extra decals are included! Some builders have problems with water slide decals. The extras are there for that reason.
2. My prototype models have had many flights on them. The feet are glued in such a way to reinforce the grain directions. I've had no cracks in the legs or feet. Regarding the hands, there's really no chance of the hands splitting where they are located.
3. The pipe cleaner antennas (even bent) will not effect the vertical path of the rocket! You'll just have to see a flight to believe it.

Last note: Do not use the Quest C6-5 engines in the Little Green Man or Pigasus rockets.
Please use Estes engines!

Little Green Man in the Wild!


It's always good to see an Odd'l kit made by somebody else!

David Armstrong posted a pic of his Little Green Man on the NAR Facebook page. It looks great!

(To be honest, I didn't even know there was a NAR group on Facebook. I'm not a Facebook fan but I'll be checking back more often.)
https://www.facebook.com/groups/2255560886/

David's L.G.M. is sporting a darker green finish and a blue belt buckle. (It looks like he's got a tan, maybe returning from a beach vacation.)

If you have any Odd'l pics you'd like to share, please send them to me and they might end up posted on this Odd'l blog!


Sunday, September 7, 2014

Flare Test, Orlando R.O.C.K. Launch, September 6, 2014


The replacement for the Powered FLIC in the Odd'l Rockets Combo kit might just be the FLARE, shown at the left.
It's second test flight was at the Orlando R.O.C.K. monthly launch.
I tried an A10-3t engine.
While the flight was very stable, it seemed almost too fast off the launcher.
Even with the tail cone drag, the A3-4t engine would be a better choice.
More flight testing will follow.


The new Odd'l Rockets LITTLE GREEN MAN had another stable C6-5 flight.
Here the L.G.M. reclines after touchdown.

Wednesday, September 3, 2014

Return of the Little Green Man Video

Roger Smith has been busy with his video editor.
CLICK HERE
The revised Little Green man video shows an added C6-5 flight from last months Bunnell NEFAR launch.
The Little Green Man is very "vocal" on this new video. 

Tuesday, September 2, 2014

Flare / Bell Bottom Build, Part 2 Design Process


Here's the back view with the shroud over a 5/60 centering ring.
There's no engine hook, the engine is slid in place and gets a wrap of masking tape over the BT-5 tube.

The extended shroud isn't as strong as I would like.


Below the centering ring I'm adding a short "nested" shroud.
This will but up against the centering ring and be even with the back end of the outside shroud.


The entire model was dry fitted to see the finished shape.
I'll probably keep the launch lug short, right beneath the hole in the shroud. It's never easy to trim the lug end even with the angle of the shroud.

Monday, September 1, 2014

Flare / Bell Bottom Build, Part 1 Design Process

Drawing up a shroud can be tough, if you are off by the slightest bit the fit will be poor.
I use the shroud tool on www.payloadbay.com for a start.
But, the shroud will have to be printed later with more than one shroud per sheet of card stock.

The shroud was dropped into Corel Draw and redrawn.
Three shrouds were made, one slightly larger another a bit larger.
One of the three should give a friction fit over the BT-5 body.

The lug hole is pre-punched and will be in the kit.
That small hole is hard to cut out after the shroud is formed. By pre-punching the lug hole I'll have a perfectly round top to the lug recess hole.

After the shroud is glued up, the straight vertical lines in the lug slot are cut with scissors.
This keeps the shroud stiffer when forming and gluing. If the lug slot were completely cut out (before forming the shroud) it is harder to get it round on the narrow end.